AZURE VM “An authentication error has occurred. The Local Security Authority cannot be contacted.”

Azure  The Local Security Authority cannot be contacted. This gave me some grief about an authentication error has occurred — Azure –

An authentication error has occurred. The Local Security Authority cannot be contacted.The solution was simple once I had figured out the hoops

  1.  In azure portal — Enable Admin Account
  2. Reset Admin Password
  3. Open Azure PowerShell — Find the actual name of the server  Or IP addressAzure Powershell
  4. RDP To your azure server —-   yourserverNAME\YourAdminAccout
  5. You  RDP via IP Address as well

    RDP AZURE


The last step might be needed to fix active directory – forcing the disjoin and rejoin into your windows active directory domain

Remove computer from non-existant domain after you have local admin access.

— RUN CMD as administrator


netdom remove computername /force


share with friends

Share to Google Buzz
Share to Google Plus
Share to LiveJournal
Share to Odnoklassniki
4 Comments

OctoPrint TouchUI 3d Printer error software update

OctoPrint

OctoPrint

Fixed an odd issue today when I clicked the update button on octoprint for touchUI- my TouchUI BROKE!  Error message – Touch UI “Installing the plugin from URL “unknown” failed: Could not parse output from pip touchui”

The only fix I found was to manually dump the TouchUI  octoprint plugin 🙁 

pop up shows –URL “unknown” failed: Could not parse output from pip touchui”

You will need to go the home folder and find your pi user where you installed OctoPrint – and it you need to manually remove the  TouchUI pluginGet ride of the old Touch UI that can not be updated and gives error

From your octoprint server terminal   — ssh or from the console terminal

    1. cd ~/oprint/lib/python2.7/site-packages/
      

      Then use the below  commands removes the  2 folders with the touch UI settings and their contents

      
      rm -rf octoprint_touchui/
      
      rm -rf TouchUI-0.3.6-py2.7.egg-info/
      

      octoprint_touchui

    1. touchui-egg
      Restart octoprint server

      sudo service octoprint restart
       
    1. From the octoprint server go to settings -
      plugin manger and re download TouchUI
       
  1. restart octoprint again
    sudo service octoprint restart
     

Happy to stay the above removal and then the reinstall of the plugin after the restart – fixed my issue.  ( PS find -name touchui helped find with the config files lived. )

TouchUI -- ITS BACK

TouchUI — ITS BACK

This pic below is out of order but shows the restart option and the process  🙂

TouchUI FIx

share with friends

Share to Google Buzz
Share to Google Plus
Share to LiveJournal
Share to Odnoklassniki
3 Comments

Linux Ubuntu Chrome TinkerCad 14.04 16.04

Ubuntu TinkerCad gives error No webGL – Chrome Browser webGL unavailable  pop up

  1. In top URL line – Go to webpage – *its an interal settings page fro chrome
    chrome://flags
  2. Scroll down to WebGL and enable it
  3. go to regular Chrome settings — open Chrome Settings menu
  4. Click -> at very bottom–> Show advanced settings…
  5. Scroll down and click the check box –> use hardware acceleration when available chrome
  6. exit all Chrome browsers
  7. Restart Chrome

Review — http://ccm.net/faq/40585-how-to-enable-webgl-on-google-chrome

Review — https://www.cnet.com/how-to/a-quick-fix-for-your-slow-chrome-browser/

TinkerCad Chrome fix

TinkerCad Chrome fix

You can now check out

chrome://gpu/

Graphics Feature Status

  • Canvas: Hardware accelerated
  • Flash: Hardware accelerated
  • Flash Stage3D: Hardware accelerated
  • Flash Stage3D Baseline profile: Hardware accelerated
  • Compositing: Hardware accelerated
  • Multiple Raster Threads: Enabled
  • Native GpuMemoryBuffers: Software only. Hardware acceleration disabled
  • Rasterization: Software only. Hardware acceleration disabled
  • Video Decode: Software only, hardware acceleration unavailable
  • Video Encode: Hardware accelerated
  • VPx Video Decode: Software only, hardware acceleration unavailable
  • WebGL: Hardware accelerated
  • WebGL2: Hardware accelerated


share with friends

Share to Google Buzz
Share to Google Plus
Share to LiveJournal
Share to Odnoklassniki
0 Comments

Adding Cura Ubunu how to

  How to install WxPython 3.0 on Ubuntu 14.04

A number of issues come up on my screen and i wanted Cura for 3d prining on my LTS ubuntu distro

Installing wxpython on ubuntu 14.04 –

You need to add the back ports patch package to 14.04

sudo add-apt-repository ppa:adamwolf/kicad-trusty-backports
sudo apt-get update

You need to add the back ports patch package to 14.04

sudo apt-get install python-wxgtk3.0

Install Cura – 14.04

sudo apt-get install cura

share with friends

Share to Google Buzz
Share to Google Plus
Share to LiveJournal
Share to Odnoklassniki
2 Comments

ANET A8 3D Printer Build

ANET A8 3D PRINTER Build purchased from ebay

aneta8_build

aneta8_print3 aneta8_nozel aneta8_print3 anet8_printtest
anet8_print-2 aneta8_nozel


share with friends

Share to Google Buzz
Share to Google Plus
Share to LiveJournal
Share to Odnoklassniki
0 Comments

Arduino Access Denied Ubuntu

Ubutnu Arduino 1.6.8
Resolve error: Arduino /dev/ttyACM0 : Permission denied error. Works on Ubuntu 14.04 15.04, Mint , Debian

  • You need to add your user account to the linux group: dialout
  •  After your in the group you need add permissions use the /dev/ttyUSB0
  •  Reboot –
  • After reboot open Arduino 1.6 and upload your new program – CHEERS


arduino__Permission_denied

arduino__Permission_denied

HOW TO:

Open a Terminal window find out the user you need to add

Take note of the user name from the whoami command
 
whoami 

Take note of the user name from the whoami command that is the user you need to add to the group dialout

sudo adduser UserFromWhoAmiCommand dialout
sudo chmod a+rw /dev/ttyUSB0 


example:
open termainal
whoami
$desktop:~$ johndoe

#****Next Add John Doe to dialout group and update permssion
sudo adduser johndoe dialout
sudo chmod a+rw /dev/ttyUSB0

Last step – Reboot computer
I know its Linux and its 2016 but sometimes a reboot is needed to ensure your permission update took place – reboot 🙂


share with friends

Share to Google Buzz
Share to Google Plus
Share to LiveJournal
Share to Odnoklassniki
0 Comments

PowerShell Count Character in String variable

This is the easy way — $var.length

$characters = "abcdefg"
 
#store the number count in $x 
$x= $characters.length
 
write-host $characters.length  $x  
 
#result 
 PS C:\scripts\powershell>  
 7 7
 

Below is the hard way

$characters = "abcdefg" 

$charCount =    ($characters.ToCharArray() | Where-Object {$_} | Measure-Object).Count
 
 
write-host 
 $charCount 
 
PS C:\scripts\powershell 
7  
 
PowerShell Character Count  -

PowerShell Character Count –

share with friends

Share to Google Buzz
Share to Google Plus
Share to LiveJournal
Share to Odnoklassniki
6 Comments

Arduino LCD Count Down Timer Clock

Simple Count down timer Code can be updated to meet your needs.

Adjust the arduino countdown code for:

  • hours
  • minutes
  • seconds
  • You might need to update the LCD pin out for your brand of LiquidCrystal lcd, my LCD board is a sainsmart 1602

Count Down Timer LCD Arduino

Arduino LCD Count Down Timer Clock

When Arduino count down is completed it says:

END


#include <LiquidCrystal.h>
 //www.brilliantlyeasy.com/ 

int hours = 0; // start hours
int minutes = 0; //start min
int seconds = 5; //start seconds

//LiquidCrystal lcd(12, 11, 5, 4, 3, 2); //<--removed- Different LCD manufacture
LiquidCrystal lcd(8, 9, 4, 5, 6, 7);//Pin Code for Arduino SainSmart LCD 1602 KeyPad

void setup() {
}

void loop() {
 lcd.begin(16, 2);
 lcd.print("Count Down Timer ");

 // lcd.scrollDisplayLeft();
 // wait a bit:
 delay(150);

 while (hours > 0 || minutes > 0 || seconds >= 0) {

 lcd.setCursor(4, 2);

 (hours < 10) ? lcd.print("0") : NULL;
 lcd.print(hours);
 lcd.print(":");
 (minutes < 10) ? lcd.print("0") : NULL;
 lcd.print(minutes);
 lcd.print(":");
 (seconds < 10) ? lcd.print("0") : NULL;
 lcd.print(seconds);
 lcd.display();
 stepDown();
 delay(1000);
 }
}

void stepDown() {
 if (seconds > 0) {
 seconds -= 1;
 } else {
 if (minutes > 0) {
 seconds = 59;
 minutes -= 1;
 } else {
 if (hours > 0) {
 seconds = 59;
 minutes = 59;
 hours -= 1;
 } else {
 trigger();
 }
 }
 }
}

void trigger() {
 lcd.clear(); // clears the screen and buffer
 lcd.setCursor(5, 1); // set timer position on lcd for end.

 lcd.println("END ");
 delay(1000);

 lcd.display();
}

share with friends

Share to Google Buzz
Share to Google Plus
Share to LiveJournal
Share to Odnoklassniki
15 Comments

Arduino SainSmart LCD 1602 Keyboard Shield

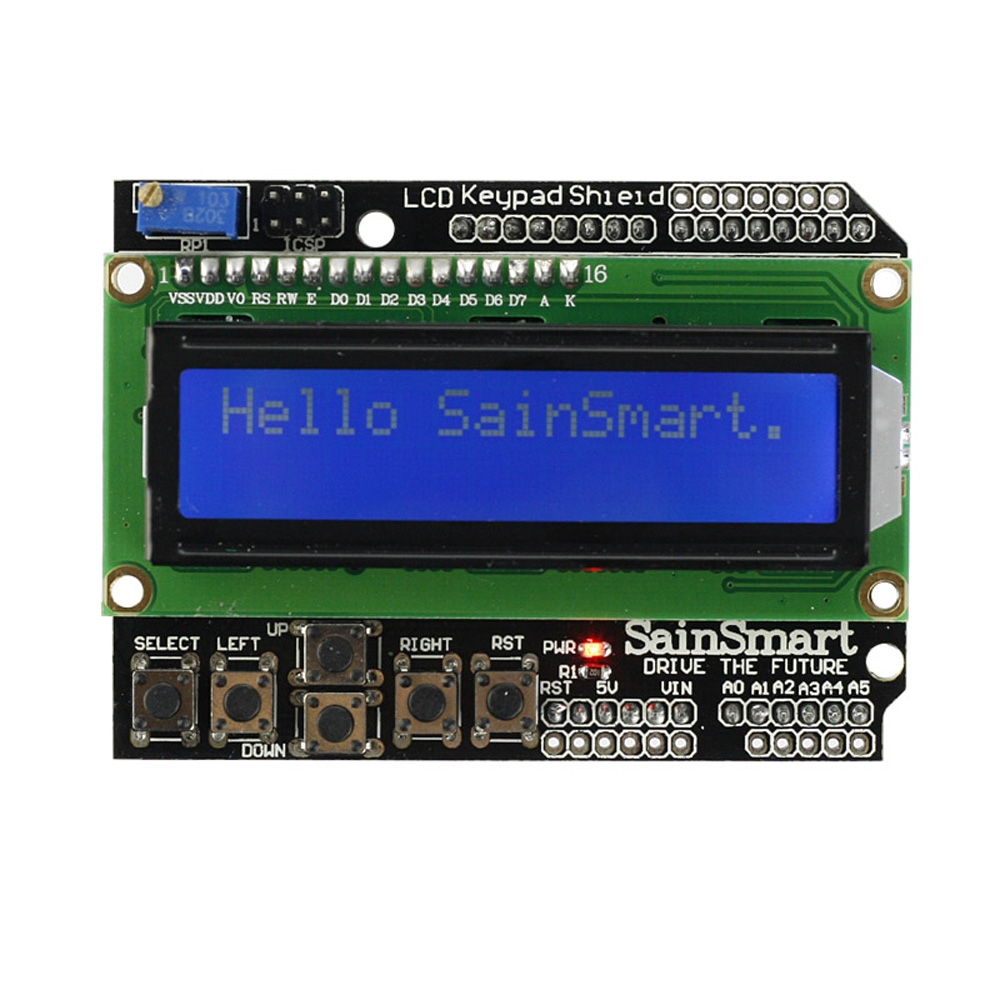
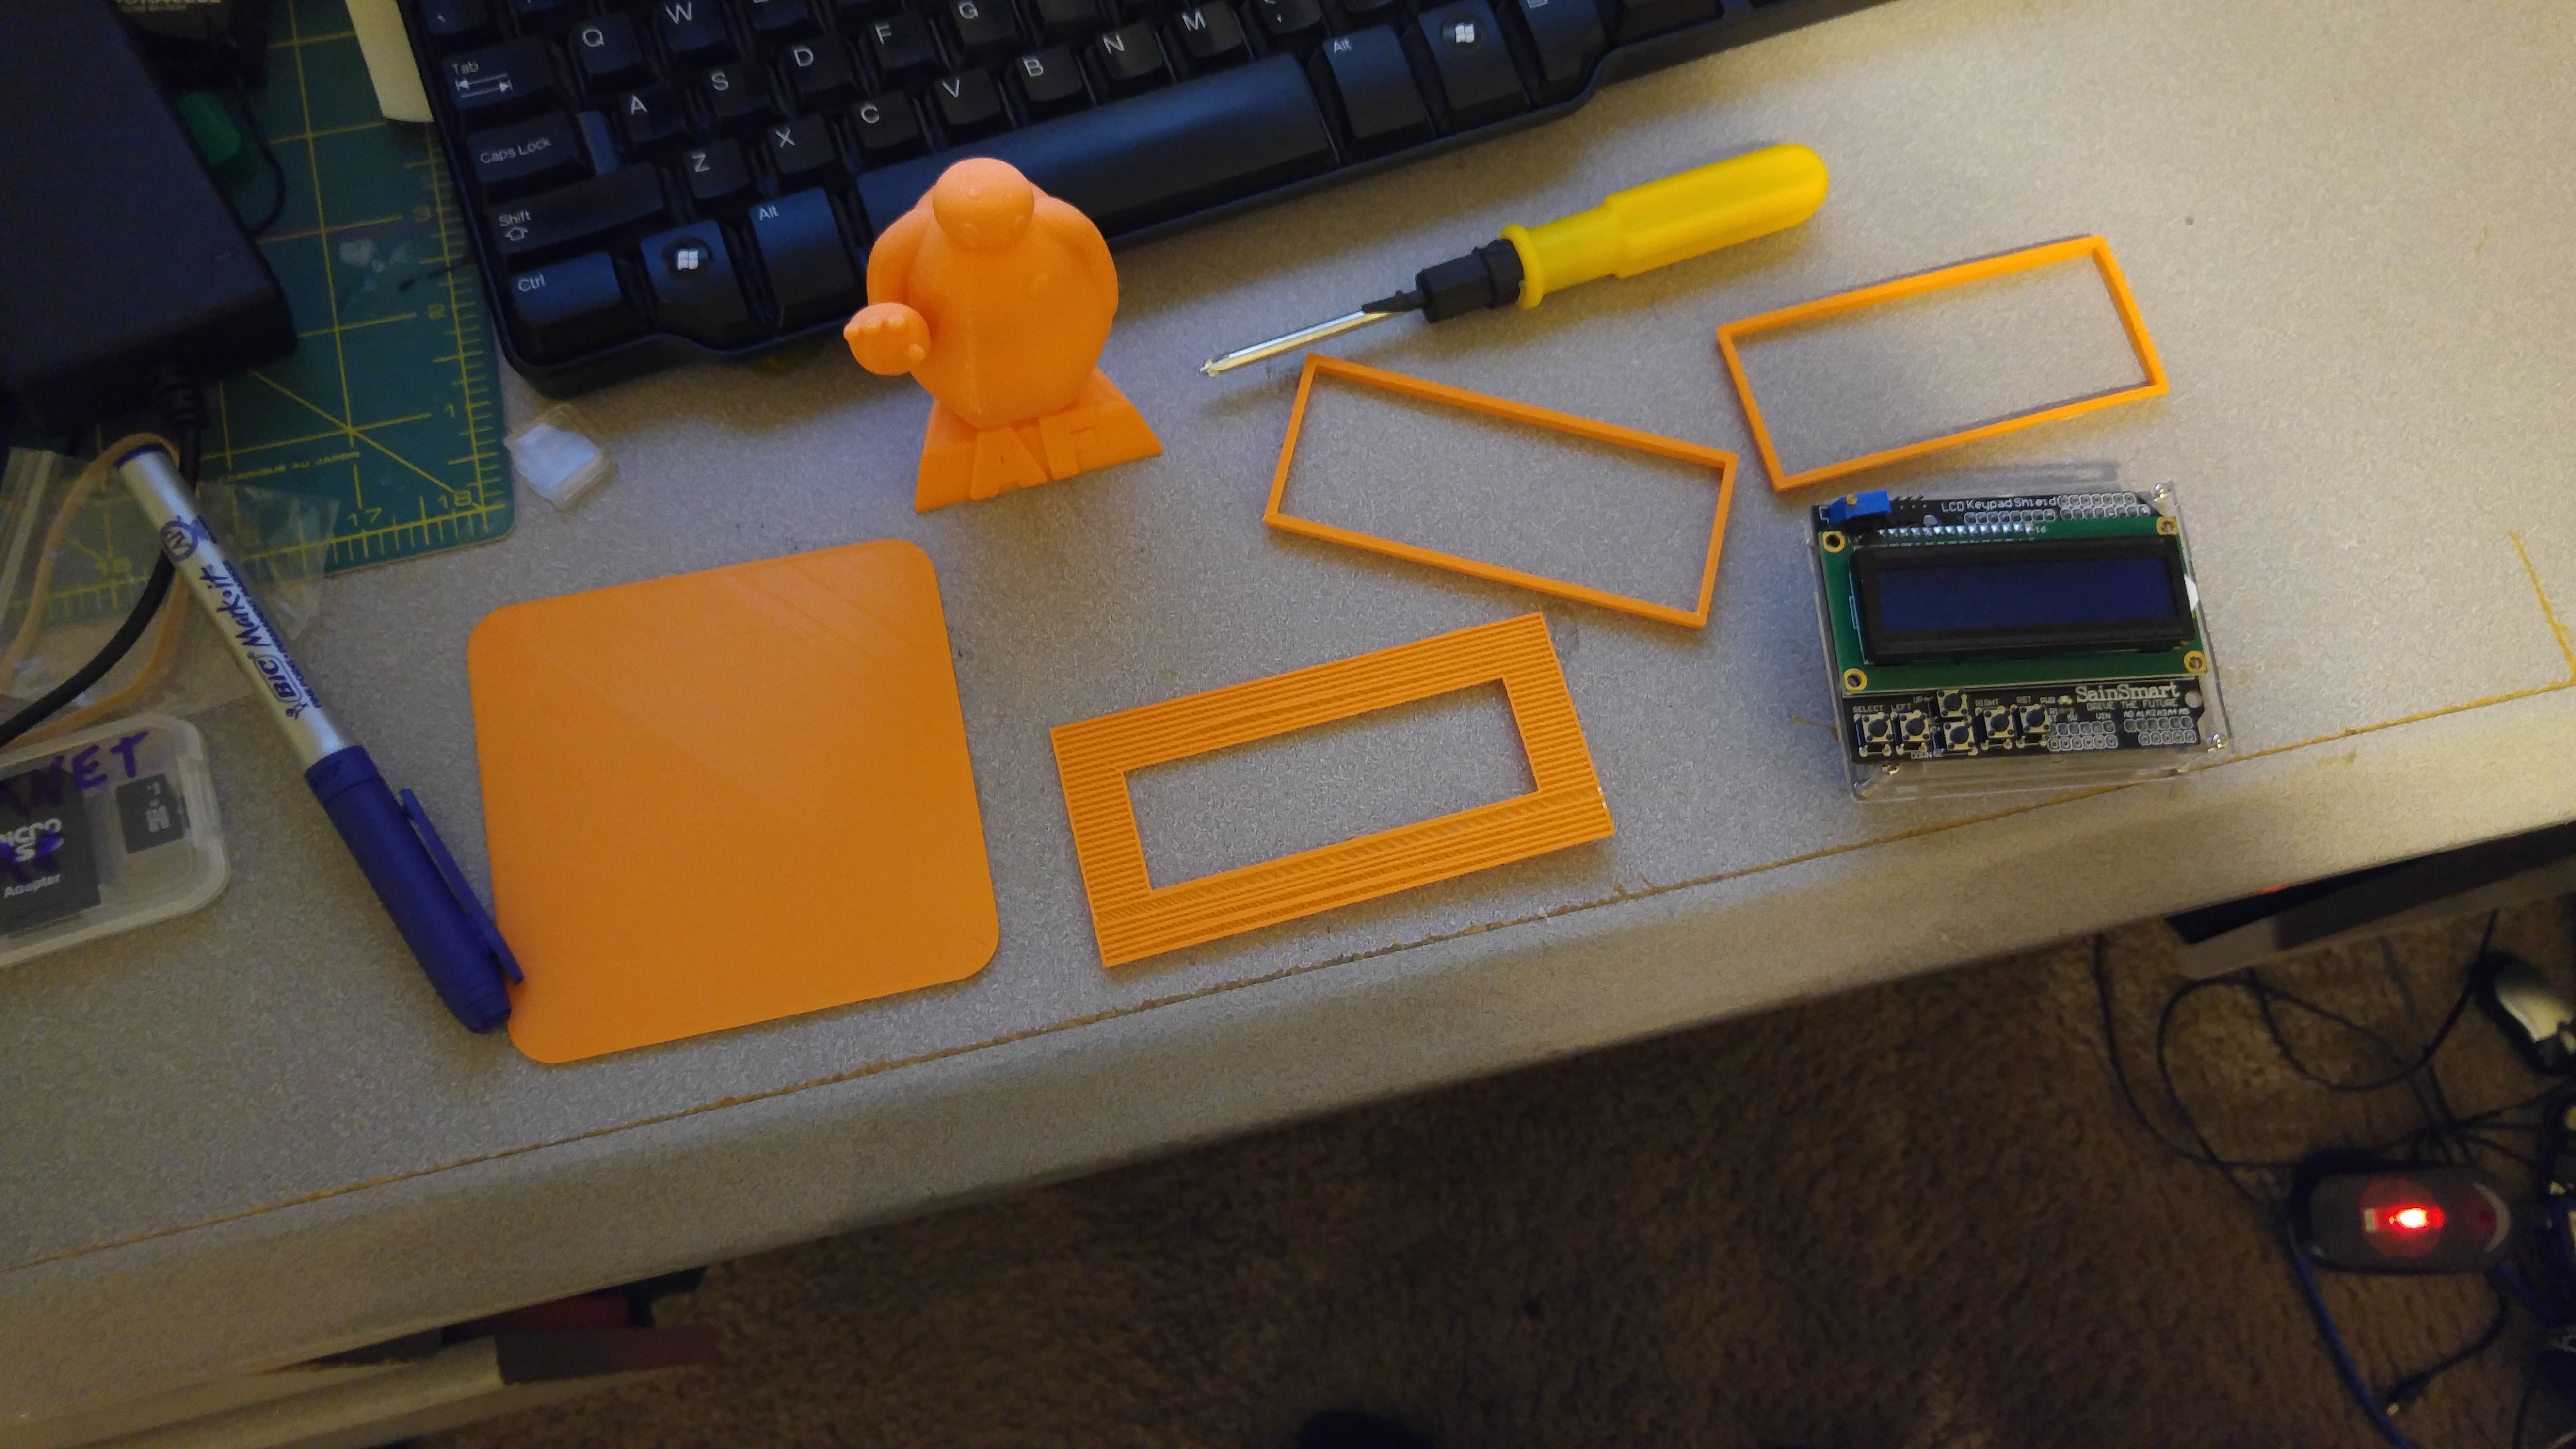
SainSmart 1602 LCD Keypad Shield Example Fix

The issue, my new sainsmart LCD keypad 1602 would not work with the default arduino liquid crystal examples for hello world or any thing else in the example section of LCD. After some research I figured out the issue, the sainsmart has a unique pin layout and there is an easy fix.   The default example uses a LCD  array of  //LiquidCrystal lcd(12, 11, 5, 4, 3, 2); but the sainsmart 1602 has a different layout. The Sainsmart pin array uses LiquidCrystal lcd(8, 9, 4, 5, 6, 7);

Comment out or remove the the LINE of code with (12, 11, 5, 4, 3, 2)


//LiquidCrystal lcd(12, 11, 5, 4, 3, 2); //<--removed
LiquidCrystal lcd(8, 9, 4, 5, 6, 7); //Code for SainSmart 1602 KeyPad
Below is a working code example using the
SainSmart LCD 1602 Keyboard Shield on an Arduino UNO

TIP: dial down the potentiometer screw to get a more clear display, for the brave remove the clear protective plastic film that covers the LCD.

//SainSmart 1602 keypad shield hello world example code
// include the library code:
#include <LiquidCrystal.h>

// initialize the library with the numbers of the interface pins
//LiquidCrystal lcd(12, 11, 5, 4, 3, 2);
LiquidCrystal lcd(8, 9, 4, 5, 6, 7);
void setup() {
// set up the LCD's number of columns and rows:
lcd.begin(16, 2);
// Print a message to the LCD.
lcd.print("hello, world!");
lcd.setCursor(0,1); // move to the begining of the second line
lcd.print("Second Line!");
}

void loop() {
// Turn off the display:
//lcd.noDisplay();
delay(500);
//Turn on the display:
lcd.display();
delay(1500);
}

PS: My wife asked if I was programming an old school pager ….I would have to agree with her on  the sainsmart 1602 keypad does look like an old school retro beeper / pager.

None the less… for 10.99 at microcenter it has some serious potential, and loads of fun! perfect for teaching / learning to code on an LCD.

When I had the LCD display “I LOVE YOU” …..  made her smile

share with friends

Share to Google Buzz
Share to Google Plus
Share to LiveJournal
Share to Odnoklassniki
5 Comments

osx 10.6 print wireless brother HL-L2340DW, HL-2400DW

The Brother site sates that the drivers for the HL-2340DW, HL-L2340DW & HL-2400DW does not work on 10.6.x OSX!

I found an easy way around this, and have it working without issue. This works because the printer is nearly the exact same model on the under lying technology as the older printer drivers.

OSX  10.6 print wireless brother HL-L2340DW, HL-2400DW

Brother customer service may not support this 🙂 BUT ALL I WANT TO DO IS PRINT AND NOW MY WIFE IS HAPPY ~!

1. Setup the WI-FI on the printer manually -under the options menu on the actual printer under the  network menu (This took 10min to figure out the menu options)

2. Under network – Wi-FI find / Search and select your SSID *select the name of you WI-FI network

3. Enter your  pin -password / network key – AGAIN doing all of this on the SMALL lcd screen of the physical printer – pushing up and down on the little  buttons to got to each letter, hitting  the”OK” button to move to next word.

4. Once complete the printer LCD will say connected !  Click the button to go back to main screen


5. DOWN LOAD the “not so supported  driver”

Go to the brother website and select –>link

LINK:

Select a Product Group: HL series – Model: HL-2270DW


This works since the printer is nearly the exact same model as to its board technology, you are tricking the printer via its driver. 

6. Install the downloaded driver

7. In Systems Preferences of OSX – Click the little + button -> add new printer.


Click the IP printer

IP Line Printer

8. Add the IP Address of the printer you setup.


Select Printer using Driver  -> Select “Brother HL-2270DW Series CUPS”

DONE — Print to your new PRINTER!

For advanced users  ( I recommended you set your router to have a DHCP exclusion for the IP of the printer)

share with friends

Share to Google Buzz
Share to Google Plus
Share to LiveJournal
Share to Odnoklassniki
14 Comments