Archive | Uncategorized RSS feed for this section

Chrome Fix DNS leaks – SSH / SOCKS Tunneling

Chrome was leaking DNS  on my windows 7 box when attempting to watch the World Series game.  I needed a way to use chrome and watch the game without leaking DNS. After several minuets of wireshark and dns tools it lead me to find the resolution below to fix google Chrome Version 38.0.2125.111 m and its leaking DNS.  


1.  Set up a SSH tunnel using windows open-source / free terminal emulator tool  – putty down load –> DOWNLOAD PUTTY  (google  HTTP over SSH  TUNNEL using putty)

2. create a desktop shortcut that links to Chrome.

3. right click the new link and click properties

4. In the shortcut link EDIT  the  Target line to the text below:

“C:\Program Files (x86)\Google\Chrome\Application\chrome.exe” –proxy-server=”socks5://127.0.0.1:5432″ –host-resolver-rules=”MAP * 0.0.0.0 , EXCLUDE 127.0.0.1″
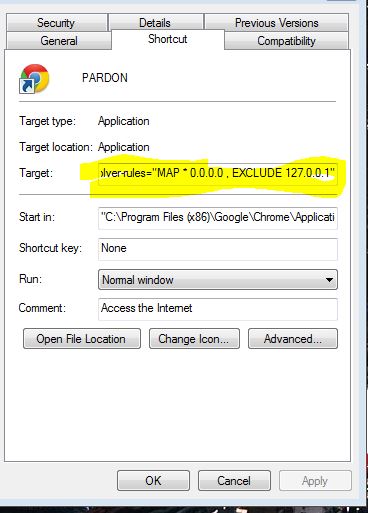
 

chrome Shortcut

5. Close the shortcut properties and start Chrome using the new link

6. go to a page like cnn.com  — The site should not connect

*Open wire shark and verify that you are using remote DNS and not leaking DNS – The key items are the flags used when starting the shortcut link  ( –proxy-server=”socks5://127.0.0.1:5432″ –host-resolver-rules=”MAP * 0.0.0.0 , EXCLUDE 127.0.0.1″)


3 Comments

VMware find duplicate IP address for server / vm vCenter VSphere

Script will use POWERCLI to run on your vmware environment *Tested in 5.1 Vsphere

1. download powerCLI *powershell for vmware  – https://my.vmware.com/web/vmware/details?downloadGroup=VSP510-PCLI-510&productId=285 

2. create script findIP.ps1

3. Copy and paste code into file NOTE:(make sure that the line $results= Get-View -Viewtype ………TO……..$strMacToFind)}} is on one line! not multi lines)

#Author  http://brilliantlyeasy.com/
#format of mac address argument in quotes “08:00:69:02:01:FC”
#use the mac of a network setting you know has the correct setting that has a conflict
#to run
# ./findIP.ps1 “08:00:69:02:01:FC”

#connet to vmware
$vCenterSv = ‘YOUR VCENTER SERVER’
$pass = Read-Host “Please enter Administrator password of VMWARE ENV”
$ConnectVcenter= Connect-VIServer -Server $vCenterSv -User administrator -Password $pass

$strMacToFind= $args[0]
$results= Get-View -Viewtype VirtualMachine -Property Name, Config.Hardware.Device | ?{$_.Config.Hardware.Device | ?{($_ -is [VMware.Vim.VirtualEthernetCard]) -and ($_.MacAddress -eq $strMacToFind)}}
write-host $results.name


#format of mac address argument in quotes "08:00:69:02:01:FC"
#use the mac of a network setting you know has the correct setting that has a conflict
#to run
# ./findIP.ps1 "08:00:69:02:01:FC"

#connet to vmware
$vCenterSv = 'YOUR VCENTER SERVER'
$pass = Read-Host "Please enter Administrator password of VMWARE ENV"
$ConnectVcenter= Connect-VIServer -Server $vCenterSv -User administrator -Password $pass

$strMacToFind= $args[0]
$results= Get-View -Viewtype VirtualMachine -Property Name, Config.Hardware.Device | ?{$_.Config.Hardware.Device | ?{($_ -is [VMware.Vim.VirtualEthernetCard]) -and ($_.MacAddress -eq $strMacToFind)}}
write-host $results.name

Find your MAC  Vmware:

Right Click on Vm –> Edit Settings –> Hardware –> Network Adapter 1 — Mac address


vmMac

At this point you have all you need — open PowerCLI – cd to where the script is located

RUN the script!

./findIP.ps1  “00:50:56:8d:6b:ab”

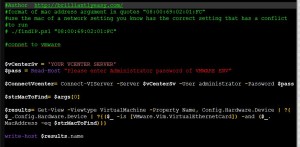
*Image below has full code of script

VMware Find Duplicate IP

0 Comments

CentOS No “you have new mail” ssh login Fix

LINUX – Command Line Login “You have mail.” Fix

This makes the SSH / command line login say if you have new mail at the time of log on:

Edit two files as root – Adding the text in the file 

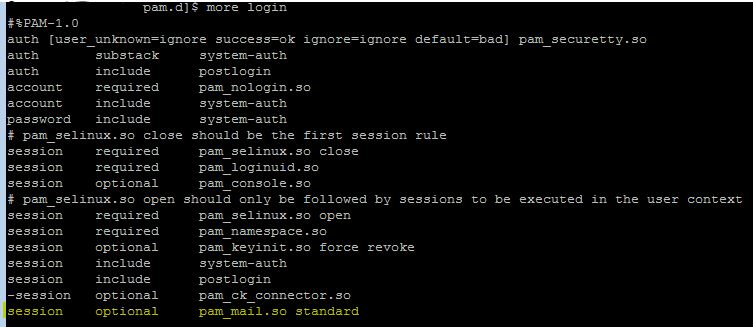
Vi — > /etc/pam.d/login

add the following line to bottom of file

session optional pam_mail.so standard

pamLogin


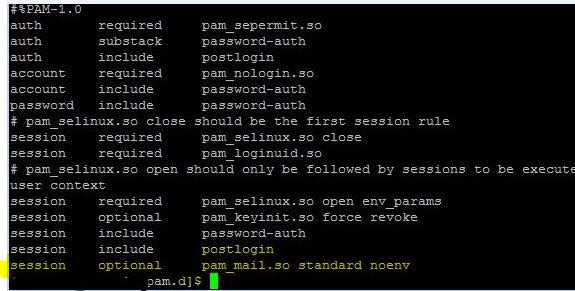
Vi — >/etc/pam.d/sshd

add the following line:

session optional pam_mail.so standard noenv

pamSSHD


By default it seems that CentOS linux does not have the “you have mail ” feature enabled for ssh logins. My issue was that  I had a brand new  Cetos 7 server -> Installed sendmail, setup the box as  mail server and then never the email  notification”you have new mail” at time of ssh login. This sent me down a long path to find the under documented pam.d feature.

0 Comments

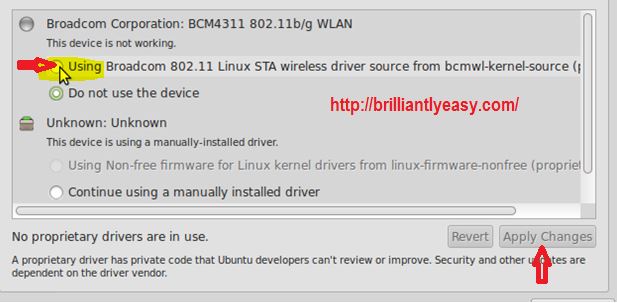
Mint 17 – Inspiron 1545 no WiFi fix

Mint 17 – Inspiron 1545 no WiFi fix
Dell Inspiron 1545 laptop
1. Put in the Mint 17 CD-Rom or have wired Network connection to web
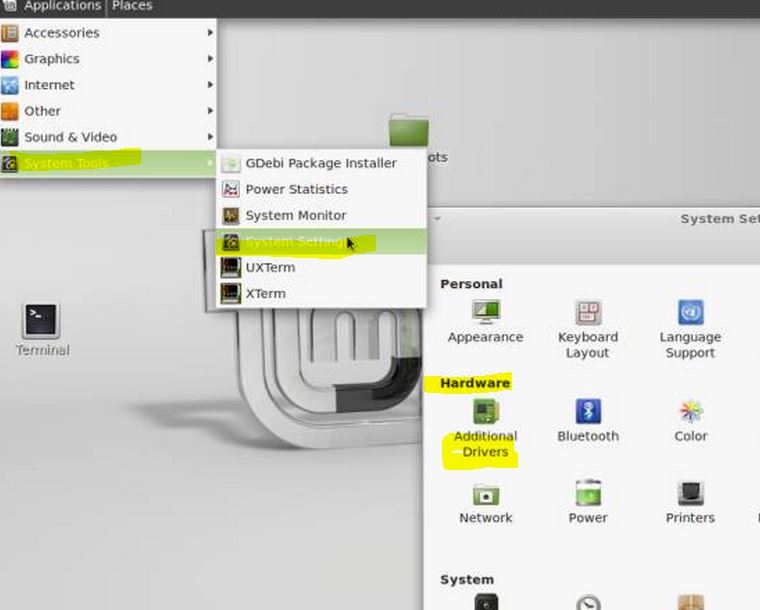
2. go to menu icon > System Settings>Hardware > Additional Drivers >
3. Click the Check box  USE Broadcom 802.11 Driver
4. Click Apply Changes (bottom right)
5. REBOOT computer

Once the Broadcom driver has been installed and computer has rebooted the wireless networking icon will appear on bottom of tool bar.

mintDriver


Mint wifi DellMint1545

Mint wifi DellMint1545

2 Comments

PowerShell Change Email Address for domain users

Create a PS1 File on the DC or connect via powerShell remote.
The script below will update users in the OU searchbase to reflect a new email address

######################################################### 
# Name: ChangeEmail.ps1
############# ##########################################
$olddomain = "OLDname.com"
$newdomain = "NewName.com"
 
Get-ADuser -Filter * -Properties givenName, Surname, EmailAddress -searchbase "OU=test2,DC=YourDomain,DC=Com" | %{
     $fname = $_.givenName
     $lname = $_.surname
     if ($_.EmailAddress -eq "$fname.$lname@$olddomain"){
         Set-ADuser -Identity $_ -EmailAddress $fname.$lname@$newdomain
	Write-Host ($_.emailAddress)
     }
}
0 Comments

Centos 6.5 heartbleed patch fix update

This OPENSSL heartbleed HOW TO documents the steps to install the openSSL heartbleed PATCH,

heartbeed patch centos linux

heartbeed patch centos linux

and then using openSSL commands the admin can verify the CentOS  6.5  openSSL heartbleed fix was installed correctly! 

 HOW TO PATCH: The commands used for patching assume your using sudo in front of each command or are running as the root# user

Run yum update on openssl –> command –>

yum update openssl

REBOOT SERVER – you can get away with only restarting services… its Linux. However,  a full reboot will ensure all services have restarted. *Grab a coffee and take the 4min downtime to reboot!To verify CentOS  6.5  OpenSSL PATCH was installed correctly! 

Now that you have rebooted…Does your CentOS server have the heartbleed SSL update ? Check/ verify update of openssl by command  ?? This also to verify a cloud hosting provider installed the patch.  

rpm -q --changelog openssl | grep CVE-2014-0160

If your server says

# - fix CVE-2014-0160 - information disclosure in TLS heartbeat extension

Your good!! On first part

Check part 2:

 Yum info openssl 

You want to see the below –

Installed Packages
 Name : openssl
 Arch : x86_64
 Version : 1.0.1e
 Release : 16.el6_5.4
 Size : 4.0 M
 Repo : installed

 If the above  Installed packages is shown your good on the 2nd part! 

Check openssl by command part 3 :

 openssl version –a 

If your server says the bleow you are good the patch has already been applied:

OpenSSL 1.0.1e-fips 11 Feb 2013
built on: Tue Apr 8 02:39:29 UTC 2014
 

  (Additionally… MAKE SURE the second part on “built on: date above”shows that it is a date of Tue Apr 8 02:39:29 UTC 2014 or more a more current date)

? IS MY SITE SAFE? SITE TO TEST remotely

http://filippo.io/Heartbleed/

  Regarding the reboot. 

Yes, I know this is Linux and you can just bounce individuals services. However, it is somewhat safer and ensures that no lingering services sill have hold of older openSSL items. I say take the 10 min downtime to bounce entire server  so that you know good an well the openssl heartbleed patch is installed and safe!

2 Comments

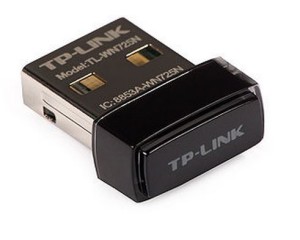
Ubuntu Linux TL-WN725N TP-Link version 2 WiFi driver install

Ubuntu fix TL-WN725N wireless not working – Step by step install TP-Link TL-WN725N  nano version 2 WiFi ubuntu driver install.*User verified on raspberry pi TL-WN725N , linux Mint 17 and Mint 16 This how to will work on Ubuntu TL-WN725N install, Debian TL-WN725N install,kali TL-WN725N install, and Mint TP-LINK TL-WN725N usb WiFi driver installers: Linux how to install TL-WN725N usb nano driver. Works on Raspberry Pi 2 Model B with Ubuntu.

Quick List:: Do each command below as root or use sudo in front of commands *Tip:  Use command:       sudo su – The above command will give root permissions to your  command terminal window, and you want have to keep typing sudo before each commando

apt-get update
apt-get install linux-headers-$(uname -r)
apt-get update
apt-get install build-essential
apt-get install git
git clone https://github.com/lwfinger/rtl8188eu
cd rtl8188eu
make all
make install
insmod 8188eu.ko

ifconfig #(check to see if your wireless wlan cards is now listed)

#optional step ...reboot may be necessary
#sometimes a reboot helps pickup newly installed devices
reboot
DONE! Now you can use that sweet new wlan TP-LINK TL-WN725N  WiFi usb card!!
Linux TL-wn725n Driver how to

inux TL-wn725n Driver how to

Full (LONG) Version of how to : 
TL-WN725N TP-Lin Linux Driver install k version 2 WiFi USB 

1.  First you need to have kernel headers, 
build- essential packages and git installed. 
This is so  your kernel is prepped for the new TL-WN725N TP-Link v2 driver. 
  (Model: TL-WN725N Ver: 2.0) 

Step by step...If you don't have linux-headers, git, 
build-essential installed on your kernel
YOU NEED TO INSTALL THEM-

 Do the following items in bold:
 A. root@kali#  apt-get install linux-headers-$(uname -r)
 B.root@kali#  apt-get install build-essential 
 C. root@kali#  apt-get install git 

 Now the headers are ready for us to install the driver that
 works with TP-Link TL-WN725N

 1. root@kali# git clone https://github.com/lwfinger/rtl8188eu 
makeAll

 kali_git_TL-WN725N

2.root@kali#    cd rtl8188eu 
3. root@kali#   make all 
makeInstall
4. root@kali# make install 


5. root@kali# insmod 8188eu.ko
 Kali-insmod-8188eu.ko

6. root@kali# ifconfig 

– See if you see a wlan device listed

THANKS ..... IT WORKS!!.... NOW! HAVE FUN
112 Comments

PowerShell Windows 2012 R2 IIS FTP web user creation

0 Comments

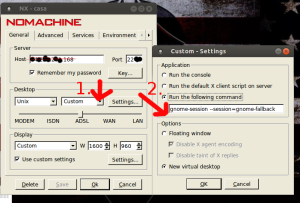
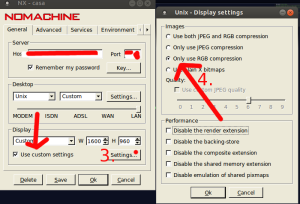
Fix: freenx 12.04 ubuntu immediately closes

The issue is with the screen compression size of 12.04 Ubuntu &  UNITY

Follow the pictures:

Set custom options

freenx ubuntu 12.04

freenx ubuntu 12.04

images_setting

Part 2- edit compression

Thanks to askubuntu.com as it was a starting point
http://askubuntu.com/questions/5

2 Comments

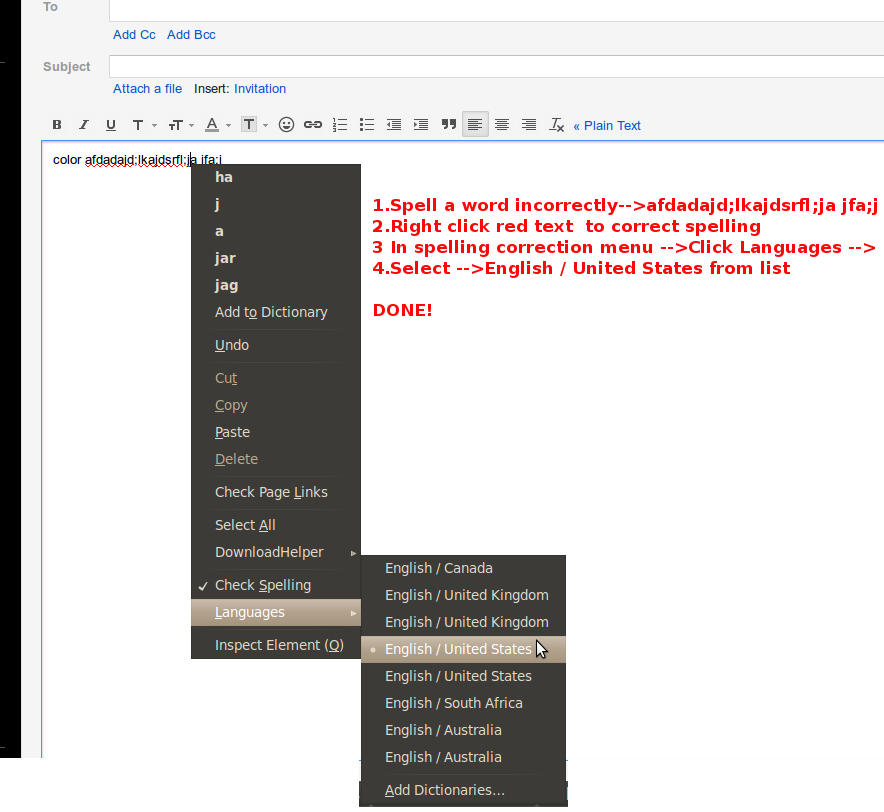
Firefox british spelling fix to US spelling

 Firefox remove / fix British language spelling  back to USA spelling/ USA dictionary

1.Spell a word incorrectly–>afdadajd;lkajdsrfl;ja jfa;j
2.Right click red text  to correct spelling
3 In spelling correction menu –>Click Languages –>
4.Select –>English / United States from list

Very annoying when typing an email and the word color is showing as misspelled due to the British spell-check version in Firefox.

The solution was found, but not a whole lot of help when asking “Uncle Google”.

language .dic fix
Thought I would post it so others don’t waste their time fixing this annoyance.

Solutions for issue: Resolved!
British Spell Checker Dictionary fix
firefox british spelling back to USA
Firefox checking for British spelling instead of US

Fix Firefox spelling

0 Comments